You can find the repo for this series here. You’ll want to look in the 2_websockets folder.
In the previous sections, we wrote the Base64 and SHA-1 modules in anticipation of needing them for our WebSockets. What we’ll do in this post is not the final step for this module, but much of the core functionality will stay the same. Essentially, this is going to be an echo server, and each socket will spit back whatever is received. We do add more than that, but it’s still far from being feature complete.
At the end, I discuss the issues with this implementation and some of the changes we’ll make going forward. Keep in mind that we’re doing all this with only the standard library, so some things will be significantly more verbose that they would be if were allowed to use third-party libraries.
In the SHA-1 article, we talked a bit about WebSockets, mostly in the context of the initial handshake that occurs between the client and the server, using this diagram as an overview:
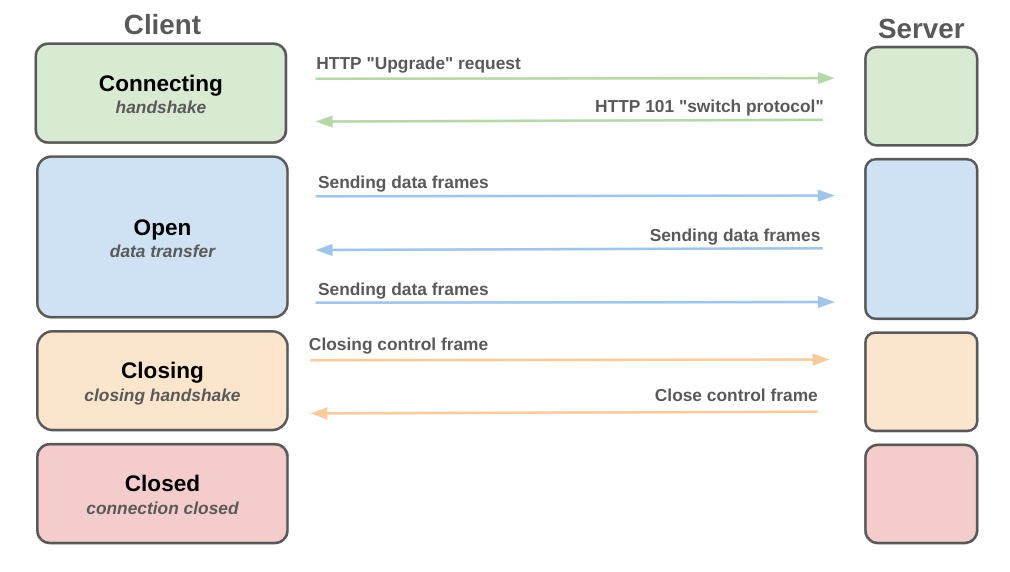
A complete description can be found in the RFC, which is well written and easy enough to follow. I’ll cover some of what’s in the document, such as how the handshake is done and how frames are composed and parsed, but otherwise, this is more on how to implement it in Rust than anything else. The comments in the code echo a lot of what is here. The repo can be found here, and I’d recommend referring to it as we go forward.
Here is an overview of our websocket.rs module:
// websocket.rs

pub struct WebSocket {
    stream: TcpStream,
}

impl WebSocket {
    pub fn new(stream: TcpStream);

    pub fn connect(&mut self)
    fn handle_handshake(&mut self, request: &str)

    pub fn handle_connection(&mut self)
    fn parse_frame(&mut self, buffer: &[u8])
    fn send_ping(&mut self)
    fn send_pong(&mut self)
    fn send_text(&mut self, data: &str)
}
There’s not a lot here at the moment, though some of these functions do a lot of heavy lifting. We’ll be focusing primarily on connect, handle_connection and parse_frame, in that order. Only two these need to be public at this point, though later on we’ll be exposing more functions to do things such as handle communication between users.
First, though, we’re going to look at how we can make use of this WebSocket in our main.rs and then after that we’ll dig into the details of the socket itself works.
To get started with our server we’ll need to create a loop which listens and accepts incoming connections from users. We’ll also need to validate those requests to check that they are WebSockets. To do that, we’ll start in our main function and create a loop with a TcpListener that accepts all incoming requests and then passes them off to handle_client:
// main.rs
fn main() {
    let listener = TcpListener::bind("127.0.0.1:8080").expect("Could not bind to port");
    println!("WebSocket server is running on ws://127.0.0.1:8080/");

    for stream in listener.incoming() {
        match stream {
            Ok(stream) => {
                thread::spawn(move || {
                    handle_client(stream);
                });
            }
            Err(e) => {
                println!("Failed to accept client: {}", e);
            }
        }
    }
}
Here, when we get a new incoming request to connect it will spawn a new thread to handle it. Note, we do not handle any cross-thread communication, and every socket will be an island unto itself. This doesn’t seem great, but it’s an issue we’ll address in later sections of this series.
When a thread is spawned it will pass off that TcpStream to handle_client which does the following:
// main.rs

fn handle_client(stream: TcpStream) {
    let mut ws = WebSocket::new(stream);

    match ws.connect() {
        Ok(()) => {
            println!("WebSocket connection established");
            match ws.handle_connection() {
                Ok(_) => {
                    println!("Connection ended without error");
                }
                Err(e) => {
                    println!("Connection ended with error {:?}", e);
                }
            }
        }
        Err(e) => {
            println!("Failed to establish a WebSocket connection: {}", e);
        }
    }
}
What happens here is we create our WebSocket instance and call connect and then handle_connection. As we’ll soon see, the handle_connection function contains a loop that echoes messages until the connection is closed. When the connection closes, it returns from handle_connection, then handle_client, and finally terminates our thread spawned in main.
To review, we have the following process:
Hopefully this is relatively straightfoward, as the details of how this works in WebSocket are a bit more complex. .
Coming from main.rs we first call the connect function on our WebSocket. This function’s job is to validate the connection, making sure it’s what we’re expectiong for a WebSocket. Remember that we accept all connections at the start, so it’s the job of connect to weed out any that don’t below, such as a request for a cat.png or a POST statement sending banking details.
The connect function is broken into two parts: processing the initial HTTP request to determine if it’s a GET or not and conducting the WebSocket handshake. An outline of the process is as follows:
If you’re following along with the repo, you’ll see that (4) is its own private function handle_handshake. We’ll get to that in a moment, as it contains a number of steps on its own. Looking at the steps above, we’ll follow them one-by-one:
// websocket.rs - connect()

let mut buffer: [u8; 1024] = [0; 1024];
We can define the buffer to be any size we want, but this should be sufficient. If we are expecting to receive requests which are longer than 1024 bytes, we can increase the size.
// websocket.rs - connect()

// From the stream read in the HTTP request
let byte_length = match self.stream.read(&mut buffer) {
    Ok(bytes) => bytes,
    Err(e) => return Err(WebSocketError::IoError(e)),
};
Here, the stream is a member of the struct defined on instantiation in handle_client from main and given by this line:
// main.rs

let mut ws = WebSocket::new(stream);
Using this, we read in the request. The function read returns the byte length and we use that in order to create a str variable named request.
// websocket.rs - connect()

let request = str::from_utf8(&buffer[..byte_length])?;
After we have the full request as a string we can proceed.
We then ensure that our request is a GET:
// websocket.rs - connect()

// We only want to deal with GET requests for the upgrade
if !request.starts_with("GET") {
    return Err(WebSocketError::NonGetRequest);
}
WebSocket connection requests should always be an HTTP GET, so we check that here and throw an error otherwise.
The last step is broken into two parts, one of which we’ll detail in the section below, the other of which is returning the response to our user:
// websocket.rs - connect()

// Get the HTTP response header and send it back
let response = self.handle_handshake(request)?;

// Use the response
self.stream
    .write_all(response.as_bytes())
    .map_err(WebSocketError::IoError)?;

self.stream.flush().map_err(WebSocketError::IoError)?;
Ok(())
The last thing we do before we can give the “ok” on the connection is the handshake, which will take place in our handle_handshake function. You can see that after the handshake is complete, we’ll write the response back to the stream, signifying to the user that they should upgrade their connection to WebSockets.
The other part, the handshake, is what we need to look at further.
The handshake process is something we discussed briefly in SHA-1 when we looked at passing keys from the user to the server and how those keys act as validation that the user wants to upgrade the connection. It is something which isn’t too difficult to understand, though some parts will require a bit more research on your part if you want to understand exactly why they’re done that way.
The handshake process includes the following steps:
Keep in mind that each of these steps takes place as part of (4) in the connect function, so in truth there are eight steps needed in total from initiating the connection until we can start processing messages.
The handle_handshake method takes in the request we created in connect and then sets up our SHA-1 and Base64 instances so we can hash and encode, respectively.
// websocket.rs - handle_handshake()

let mut base64 = Base64::new();
let mut sha1 = Sha1::new();

let key_header = "Sec-WebSocket-Key: ";

// Given the request we find the line starting the the key_header and then find the
// key sent from the client.
let key = request
    .lines()
    .find(|line| line.starts_with(key_header))
    .map(|line| line[key_header.len()..].trim())
    .ok_or_else(|| {
        WebSocketError::HandshakeError(
            "Could not find Sec-WebSocket-Key in HTTP request header".to_string(),
        )
    })?;
The parsing of the key is a bit complex but can be broken down into:
If we have the key, we can proceed to the next step.
This part is fairly easy:
// websocket.rs - handle_handshake()

// Append key with the necessary id as per the WebSocket Protocol specification
let response_key = format!("{}258EAFA5-E914-47DA-95CA-C5AB0DC85B11", key);
As per the RFC:
For this header field, the server has to take the value (as present in the header field, e.g., the base64-encoded [RFC4648] version minus any leading and trailing whitespace) and concatenate this with the Globally Unique Identifier (GUID, [RFC4122]) “258EAFA5-E914-47DA-95CA-C5AB0DC85B11” in string form, which is unlikely to be used by network endpoints that do not understand the WebSocket Protocol. A SHA-1 hash (160 bits) [FIPS.180-3], base64-encoded (see Section 4 of [RFC4648]), of this concatenation is then returned in the server’s handshake.
What this is saying is we take whatever response_key the user sent us and concatenate it with the predefined GUID, which will be the same for every WebSocket connection. After that, we’re going to do the next two steps of hashing and encoding.
// websocket.rs - handle_handshake()

// First we take the hash of the random key sent by the client
let hash = sha1.hash(response_key).map_err(|_| {
    WebSocketError::HandshakeError("Failed to hash the response key".to_string())
})?;
This will give us a fixed-length hash.
The hash is then encoded as Base64.
// websocket.rs - handle_handshake()

// Second we encode that hash as Base64
let header_key = base64.encode(hash).map_err(|_| {
    WebSocketError::HandshakeError("Failed to encode the hash as Base64".to_string())
})?;
In both these cases, we’ll bail and return a HandshakeError is anything failed, which is a custom error type defined as part of websocket.rs.
Finally, we use the header_key and stick it into the response header:
// websocket.rs - handle_handshake()\

// Lastly we attach that key to our response header
Ok(format!(
    "HTTP/1.1 101 Switching Protocols\r\n\
    Upgrade: websocket\r\n\
    Connection: Upgrade\r\n\
    Sec-WebSocket-Accept: {}\r\n\r\n",
    header_key
))
Here we must include Upgrade and Connection in order to ensure that the WebSocket is established. The key that is sent back will also be verified by the client. If it’s invalid, the connection will fail.
At this point, if nothing has failed, a connection has been established and we’ve popped back to main.rs after calling ws.connect() in our handle_client function. The next thing we’re going to do is maintain the connection and deal with any incoming messages. This will take place in handle_connection.
The handle_connection function, which is a part of WebSocket, seems quite lengthy, but much is devoted to handling the different types of messages we might receive. All that’s really happening is the following:
There’s a little more to that, but we’ll get to that in just a moment. For now, note we have a main loop that receives requests to establish WebSocket connections. When those connections are established, they get their own loop which processes messages from only that individual user.
If you’re looking at the code for the handle_connection function, you’ll notice some stuff about ping and pong at the top:
// websocket.rs - handle_connection

// A buffer of 2048 should be large enough to handle incoming data.
let mut buffer = [0; 2048];

// Send initial ping
self.send_ping()?;
let mut last_ping = std::time::Instant::now();
let mut pong_received = false;
The buffer is just for receiving individual messages, which should be self-explanatory, but the second part is a bit more curious.
This is a setup for something known as a heartbeat, which is a way for the server to check if a connection is still active and closing it if it’s not. You might wonder why this is needed since looking further down, you see there’s something for Frame::Close, which should handle closing a connection, right?
Normally, yes, it would handle that, but that Frame::Close requires the user to send a message stating such. Since your browser will handle the details of a WebSocket connection, it will normally send this closing message even if you force quit your browser, but what if it doesn’t? In that case, we need a backup plan, and that’s our heartbeat check inside the loop:
// websocket.rs - handle_connection
// Send initial ping
self.send_ping()?;
let mut last_ping = std::time::Instant::now();
let mut pong_received = false;

// Primary loop which runs inside the thread spawned in main.rs
loop {
    // This is the check to see if the connection has timed out or not.
    // We've hardcoded it to a default of 5 seconds, but it would be
    // good to have this configurable later on.
    if last_ping.elapsed() > Duration::from_secs(10) {
        if !pong_received {
            println!("Pong not received; disconnecting client.");
            break;
        }

        if self.send_ping().is_err() {
            println!("Ping failed; disconnecting client.");
            break;
        }

        pong_received = false;
        last_ping = std::time::Instant::now();
    }
    ...
 }
This is a sizable piece of code, but it’s relatively simple in what it does:
Every 10 seconds or so, we check if the user has replied to our ping with a corresponding pong, and if not, assume the connection is dead. Here I set the time to check at 10 seconds, but you could do 60 or longer if you want.
Later, we will use this same idea to kick idle users. For instance, say someone connects to our server but then just sits there. That might be ok if it’s a chat client, but if it’s a game, that person is sucking up bandwidth that could be used by players who are actually playing. You might set a similar idle time at 10 minutes and then kick the user back to the login screen if they haven’t sent any messages aside from pong back.
Let’s now look at reading in information, which looks nearly identical to what we did in main. The difference here is that the data being sent are WebSocket frames that need to be parsed. Our read loop on the stream loops like this:
// websocket.rs - handle_connection

// Primary loop which runs inside the thread spawned in main.rs
loop {
    // Heartbeat code
    ...

    // Read in the current stream or data.
    match self.stream.read(&mut buffer) {
        // read(&mut buffer) will return a usize, and we'll want to process that if and only
        // if it's larger than 0. We then parse the frame in the parse_frame function.
        Ok(n) if n > 0 => match self.parse_frame(&buffer[..n]) {
    ...
    }
}
The majority of the work that’s being done here is taking place in this parse_frame function, which takes in the current value of the buffer and determines what action is being taken. By action, I mean is the user sending us a ping, pong, close, text, or binary message? To figure that out, let’s see what constitutes a frame and how we parse it.
WebSocket messages which are sent between the client and server are called frames, and they take on a particular form as shown in this ASCII RFC diagram. A somewhat differently formatted version is below:
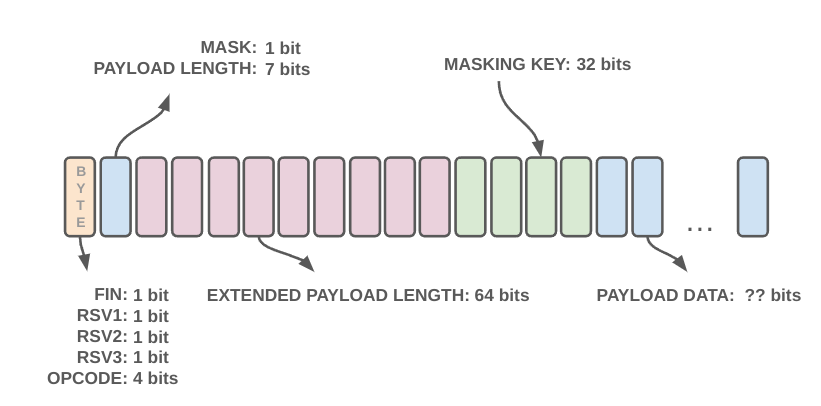
Above, each section represents a byte, with the payload data being some arbitrary number of bytes. You can read more about each of these in the RFC, though I will discuss each in some detail as we go through the code.
In parse_frame, the first thing we do is check if the length of the buffer is at least the minimum two-byte frame that would be used to close the connection:
// websocket.rs - parse_frame

if buffer.len() < 2 {
    return Err(WebSocketError::ProtocolError("Frame too short".to_string()));
}

let first_byte = buffer[0];
If so, we proceed to extract the first and second bytes as the masked bit and payload length:
// websocket.rs - parse_frame
let first_byte = buffer[0];
let opcode = first_byte & 0x0F; // Determines opcode

let second_byte = buffer[1];
let masked = (second_byte & 0x80) != 0;
let mut payload_len = (second_byte & 0x7F) as usize;
Looking at the first byte, we extract the second half of it, which is opcode for the frame. If you’re not familiar with opcodes, they signify what operation we’re going to do. In the case of WebSockets, it’s denoting how we process the message and includes:
There are also some reserved opcodes that are set aside for potential future WebSocket features, as mentioned in the RFC.
Getting back to the code above, in that first byte, we ignore the first four bits which are for FIN and RSV values. The FIN bit is a flag set for messages that are multipart/ segmented. In this example, we’re not going to implement segmented messages, but it is possible we’ll implement them in the future. The RSV values are reserved for future possible features, much like the opcodes.
In the second byte, we have a MASK bit which denotes whether we’re using a mask or not. As per the RFC:
Defines whether the “Payload data” is masked. If set to 1, a masking key is present in masking-key, and this is used to unmask the “Payload data” as per Section 5.3. All frames sent from client to server have this bit set to 1.
This leads us to the next bit of code which ensures that it is set to one.
// websocket.rs - parse_frame

 // If no masks exist, bail
if !masked {
    return Err(WebSocketError::ProtocolError(
        "Frames from client must be masked".to_string(),
    ));
}
If you’re not familiar with what masking is, the Wikipedia article on it is fairly good. Note that this bit just indicates if we’re using the masking key as defined in the four bytes which come after the extended payload section.
After the first byte and the mask bit, we have the PAYLOAD LENGTH as per the diagram above. This is seven bits, with a max value of 127. There are three values for length which matter:
Yes, the payload length can vary in size and can be expressed as a 64-bit integer (though the most significant bit must be 0), which is insanely large. The reason for this is, I suppose, future-proofing, in case sometime in the future someone wants to send the entire uncompressed collected information of humanity over a WebSocket connection.
To check these payload lengths, we use the following code:
// websocket.rs - parse_frame

// Set initially to 2 so that we skip over the first and second byte as
// used above.
let mut offset = 2;

if payload_len == 126 {
    if buffer.len() < 4 {
        return Err(WebSocketError::ProtocolError(
            "Frame too short for extended payload length".to_string(),
        ));
    }

    payload_len = u16::from_be_bytes([buffer[offset], buffer[offset + 1]]) as usize;
    offset += 2;
} else if payload_len == 127 {
    return Err(WebSocketError::ProtocolError(
        "Extended payload length too large".to_string(),
    ));
}
You’ll note that the line sets the offset after the initial two bytes, since that’s where the extended payload length will be. We only allow the code to continue if the payload_len is equal to 126 as we’re skipping extended payloads, as mentioned above.
The next step is to check that our buffer length is valid given the above and then apply our mask to the data.
// websocket.rs - parse_frame

 if buffer.len() < offset + 4 + payload_len {
    return Err(WebSocketError::ProtocolError(
        "Frame too short for mask and data".to_string(),
    ));
}

// Extract the masking key
let mask = &buffer[offset..offset + 4];

// Advance past the masking key and start on the data
offset += 4;

// Extract and apply the masking key via XOR
let mut data = Vec::with_capacity(payload_len);
for i in 0..payload_len {
    data.push(buffer[offset + i] ^ mask[i % 4]);
}
A mask is done by using XOR on every chunk of our buffer. Prior to unmasking it will look like gibberish. This unmasked data will be what we’ve received from the user, and we can then handle it based on the opcode we extracted earlier:
// websocket.rs - parse_frame

// Return the opcode and data if given
Ok(match opcode {
    0x01 => Frame::Text(data),   // text frame
    0x02 => Frame::Binary(data), // binary frame
    0x08 => Frame::Close,        // close frame
    0x09 => Frame::Ping,         // ping frame
    0x0A => Frame::Pong,         // pong frame
    _ => return Err(WebSocketError::ProtocolError("Unknown opcode".to_string())),
})
And that brings us back to our handle_connection function where we then take some action based on what was returned. That action is what we’ll discuss last, though with our echo server we’re only concerned with one thing.
In handling the frame, the Pong sets the pong _received value to true, and the Text echoes the data back. It’s when Frame::Text is found that we’re really doing anything at all:
// websocket.rs - handle_connection

Ok(Frame::Text(data)) => match String::from_utf8(data) {
    Ok(valid_text) => {
        println!("Received data: {}", valid_text);
        if self.send_text(&valid_text).is_err() {
            println!("Failed to send echo message");
            break;
        }
    }
    Err(utf8_err) => {
        return Err(WebSocketError::Utf8Error(utf8_err.utf8_error()));
    }
},
If there is any problem handling the data, the connection is terminated, which may not be ideal, but for now it works.
As we’ve gone through these examples, you’ve seen a lot of custom errors like WebSocketError, and I’d suggest checking out the full code in the repo so you can get a better idea of what each of these is handling. In the case of the loop inside handle_connection, these errors will terminate the loop and thus the connection.
You can test the code out on your own by following the steps in the README or the directions below.
First, clone the repo:
git clone https://github.com/kilroyjones/series_game_from_scratchThen run it:
cd websockets_from_scratch/2_websocket
cargo run
In the same folder, there is a client folder which contains a single HTML page that can be run to test the server. How you run this is up to you, but if you have python3 installed, you can do:
python3 -m http.serverAfter that, you’ll be able to navigate to http://localhost:8000 and see that everything is working.
There are a number of issues with our current implementation, though we’ll be looking at them as we continue. We’ve already discussed some, and you may have seen others, but here’s a short list of things we plan to address in the near future:
There are other issues, and if you see them, feel free to let me know.