This post follows from the fourth part where we talked a bit about TLS.
In truth, there’s no such thing as a JWT (JSON Web Token), but instead it acts as an outline for two different implementations known as JWS and JWE. The JSON Web Signatures (JWS) specification gives us JWTs which don’t specify an encryption algorithm, while the JSON Web Encryption (JWE) specification gives us a standard way of encrypting JSON data.
A JWS can be used to digitally sign a piece of data that is being sent, so that you know no one has tampered with it in transit. The data is the same on both your computer and the server it was requested from, though that doesn’t mean it hasn’t been read by someone snooping through your traffic. If you’re using TLS you can be fairly sure it hasn’t, but if not, then it’s all fair game.
A JWE, on the other hand, can encrypt data stored within as well as digitally sign it. That means no one can tamper with it nor can they read the contents, whether you’re using TLS or not.
To understand how this all works, let’s first look at the three parts that make up a JWT: header, payload and signature.
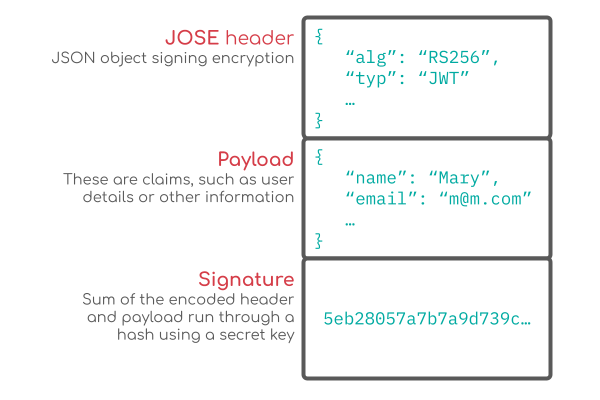
The header can contain a number of parameters, though we’ll only be looking at a few, such as alg and typ.
This can be anything, though will commonly be user information which does not need to be secured.
This signature is made from base64 encoding the header and payload, and then concatenating the results with a period between them, and then hashing the result using the private key.
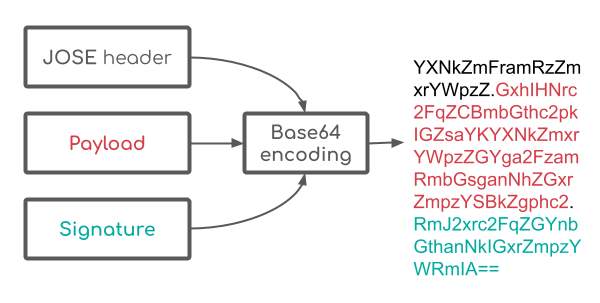
The final JWT is created by combining these three, each encoded with base64, and then concatenated using periods. Note that none of this is secured, it’s just base64 encoded. The point of your typical JWT is not to secure the information contained inside, but to verify that its holder is who they say they are.
To create a token for our API we’ll create a dummy route that acts as a sign up. You can refer to the jwt-1.rs file or you can integrate it into the previous post added TLS. To run the program you will need to make sure it’s secure as well, so you’ll need follow the mkcert directions if you haven’t already done so. You can then run the program by using:
$ cargo run --bin jwt-1And then running the client side in the client/jwt folder. Just note that you will also need to create certs (or copy over the others) like you did within the TLS post.
$ python server.py With that out of the way, let’s make the route:
|
|
Creating a token requires us to use the JWT crate, along with a handful of others like [HMAC}(https://crates.io/crates/hmac), and Sha256. The following steps are taken.
We then serialize it and return the value token to our user. In practice, this token could come from any legitimate source, such as a third-party login service. It would then be held by the user, but still verified by the service. See the diagram below:
To get our token we’re going to fetch the data by using a POST statement this time instead of a GET. To do that we’ll need to create a struct, which we’ll called AlbumRequest which takes just an id. We’ll serialize as JSON this on the client side and deserialize on the server side, which is a far more common way to send your request to an API than use the URL path-based method.
On the server side we’ll pull our JWT from the request header under Authorization. This will be sent from the client when you click the Get JWT button under sign up you’ll see a token. Once you receive that it will be passed along with the header under Authorization.
|
|
Here, much of what we do is the reverse of the what went into creating the token. If the token is valid by the verify_with_key function, then we return the requested title based on the id.