I’m a big fan of the bases, such as Pocketbase and Supabase. They make getting small projects off the ground relatively easy, though at times the docs could use a bit of love. For instance, the Supabase SSR Auth example works, but it’s mostly copy-and-paste and hope it works. There’s not much of the why, or an understanding which could help someone go beyond the basics.
What I want to do here is go through this template and describe how I see it working and how I’ve extended things. This is based heavily off of the Supabase SSR documentation on the authentication side, but I extend it use a public users table and deal with uploading profile imagers to Supabase storage. There are also some known bugs which are addressed.
I’ll preface this with the fact that I’m not an expert, and I know there is room for improvement. I’ve listed some of the things I’d like fixed in the repo’s README, and it’d be great if people made contributions.
Before we can dig into any details, I think it’s important to understand the overall flow of the authentication process, at least with regard to social auth. To do that, we’ll walk through this diagram:
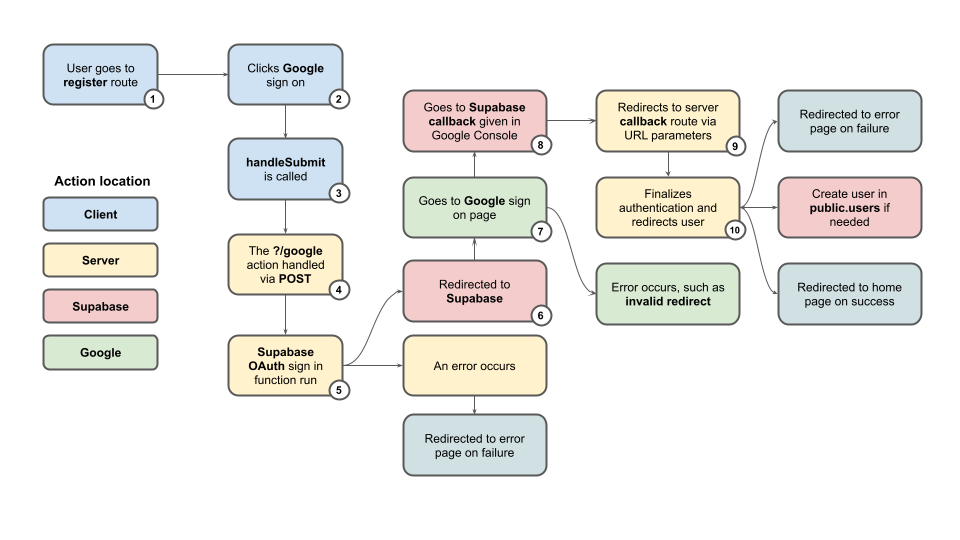
These all occur in account/register/+page.svelte or account/login/+page.svelte. Both login and register do the same thing when using a a social login, though if you were to add another provider, such as Github, you’d want to create a new GET route for handling the callback.
When logging in or registering we call a handleSubmit function which deals with our Action, whether it’s an email/password-based login or otherwise.
// account/register/+page.svelte

const response = await fetch(event.currentTarget.action, {
    method: 'POST',
    body: formData
});
With our Google login, the event.currentTarget.action is ?/google, so it will call that action in the +page.server.ts file within the register folder.
This takes place in the +page.server.ts actions section, regardless of whether it’s the login or registration page. The important bit is here:
// account/register/+page.server.ts

const { data, error: err } = await locals.supabase.auth.signInWithOAuth({
    provider: 'google',
    options: {
        scopes: 'https://www.googleapis.com/auth/userinfo.email',
        redirectTo: `${PUBLIC_ADDRESS}/${PRIVATE_SUPABASE_OAUTH_REDIRECT}/google`
    }
});
If you’d like to know what the environment variables are, take a look at the sample.env in the root of the repo. These are also explained in the README.
What the above code does is build out the URL we’re going to be redirected to at the end of the action function. The scopes should align with the scopes set in your Google Developers console (also noted in the README) and the redirect should have a base url which matches that set in the Supabase authentication setup.
Below is where this constructed URL is used:
// account/register/+page.server.ts

throw redirect(303, data.url);
This data.url will take us through the next few steps via the redirects it has attached to it. I’d recommend printing it out so that you can see the params which are attached.
You don’t really see this step, but the above data.url first takes us to Supabase, while the redirect to Google and another redirect to the callback on the server are attached as parameters. The reason for this is that Supabase holds your Google auth information and it will package up that and send it along with the request to Google.
After that invisible redirect to Supabase we’re then redirected to the Google sign-in page, provided all our setup information was correct. If you look at the URL at this step, you’ll still see two things:
If the login is successful, it will redirect first to our Supabase callback, which happens in the next step.
Here the callback to Supabase will take information provided by Google (whatever our scopes allowed) and update the login details, adding them to the private auth.users table. You can find this table via the Table Editor in the Supabase console, but it’s not directly accessible, which is why we’ll also create an entry in our public.users table which mirrors some of this data.
It’s also at this step where our session details are created and then passed along to the callback in the next step.
Getting back to our own server is done via the callback stored in the initial requerst. For us that’s at account/auth/callback/google. Supabase can find this in the URL params that were passed along to Supabase, Google, and then Supabase again. Using this, Supabase sends us back a response with a redirect that contains this exact path as well as the current session data. We then redirect to that path on our server.
In our callback (account/auth/callback/google/+server.ts), we do the following:
That is mostly done in the following code:
// account/auth/callback/google/+server.ts

const code = url.searchParams.get('code') as string;
const next = url.searchParams.get('next') ?? '/';

if (code) {
    …
    const supabaseClient = event.locals.supabase;
    const supabaseServer = supabaseServerClient;
    const codeResult = await supabaseClient.auth.exchangeCodeForSession(code);
    …
    const session = await event.locals.safeGetSession();
    user = await UserDatabase.getById(session.user.id);

    if (user == null) {
        if (session.user.id && session.user.email) {
            user = await UserDatabase.insert({
                id: session.user.id,
                email: session.user.email,
                username: session.user.email,
                profile_image: 'default-avatar.jpg',
                role: 'user'
            });
        }
    }
    …
You’ll notice that we use two different Supabase clients. This is an area I need to explore further as the createServerClient given by Supabase doesn’t seem to work with the service role key which allows us to bypass RLS. I need to look further at how to safely use Supabase RLS rules to get around this, but for now I know that I can safely use the service role key as long as I keep it server side. That’s why I created an additional client at $lib/services/supabase.server that I could easily use in my user.databaser.ts module.
I want to do a bit more testing, but I believe you should be able to create the server client using the service role key by using the createClient function and attaching it to locals in the same way. My own hesitation was the +layout.ts file would be need to be modified to include this key and I wasn’t sure if I’d be exposing it if I did this.
At this point, either an error will have occurred and we’ll be redirected to an error page, or it will have been successful and we’ll be at the home page. While this does round out the authentication process, there are still a questions:
We’ll look at each of these next.
Hooks run on every request and are often used to check the status an authenticated user, handle cookies and verify if a user is authorized to access a particular route. In the hooks file in this template, we have code related to all but the last of these functions. However, in the original Supabase SSR tutorial you’ll notice they include an authGuard handle at the bottom of their hooks file.
Since this function is called on every request, whether you’re logged in or not, let’s break down what’s happening and why.
Everything we currenly have is wrapped in the following Handle. It is then later passed to a sequence function, which a helper function for middleware (which this is) that allows you to pass multiple functions to it. For example, you might check authentication, modify headers or do other things before passing data on to the client.
Our handle looks like this:
// +hooks.server.ts

const supabase: Handle = async ({ event, resolve }) => { … }
In this, we attach our Supabase server client, as mentioned in the previous section, but more importantly, we handle the cookies needed for authentication when we are using it. This all takes place in the first bit, here:
// +hooks.server.ts

event.locals.supabase = createServerClient<Database>(
    PUBLIC_SUPABASE_URL,
    PUBLIC_SUPABASE_ANON_KEY,
    {
        cookies: {
            get: (key) => event.cookies.get(key),
            set: (key, value, options) => {
                event.cookies.set(key, value, { ...options, path: '/' });
            },
            remove: (key, options) => {
                event.cookies.delete(key, { ...options, path: '/' });
            }
        }
    }
);
This client works with Supabase RLS. In our case we allow authenticated users to select their own information. The policy might look something like this:
ALTER TABLE users ENABLE ROW LEVEL SECURITY;
CREATE POLICY "Allow authenticated users to read"
ON users
FOR SELECT
USING (auth.role() = 'authenticated');
The goal is to allow direct access to Supabase and not need to go through the server first. It makes things quicker.
The second part of hooks is a helper function that allows us to get the current user data. You’ll notice that in my implementation, there’s a note about a fix I’ve applied as per a Github post. I’ll keep an eye on this to see if it gets resolved.
Once our user is authenticated we’ll want to be able to access some of their details. To do that we’ll maintain a user store in $lib/stores/user.svelte.ts which mirrors the data in the public.users table. The public.users table that is described in the repo’s README if you’d like to get more information on setting it up.
To make this data available to our entire application I’ll be getting it via +layout.server.ts at the root of our project:
// +layout.server.ts

export const load: LayoutServerLoad = async ({ locals }) => {
const session = locals.session;
    const { data, error } = await locals.supabase.auth.getUser();

    if (data && error == null) {
        const result = await locals.supabase.from('users').select('*').eq('id', data.user.id);

        if (result.data && result.data.length > 0) {
            return {
                session: locals.session,
                user: result.data[0]
            };
        }
    }

    return {
        session
    };
};
This user information is passed from the +layout.server.ts to the +layout.ts where we then return the session, supabase instance and user to layout.svelte. Then, in the onMount of our layout we handle the any changers to user status by using onAuthStateChange:
const { data } = supabase.auth.onAuthStateChange(async (_, newSession) => {
    …
});
This function subscribes to changes in the state of the authenticated user. For instance, if they log out this will be triggered and a session or null value is passed. If the value is null, then we reset our current user:
const { data } = supabase.auth.onAuthStateChange(async (_, newSession) => {
    if (!newSession) {
        userStore.reset();
        goto('/', { replaceState: true });
        invalidate('/'); // Explicitly invalidate the current page
    }

    if (newSession?.expires_at !== session?.expires_at) {
        invalidate('supabase:auth');
    }

    if (user) {
        userStore.set(user);
        mounted = true;
    }
});
Once we have this set up so that our userStore mirrors the information that Supabase is storing for a user, we can use it throughout the project, such as on our navbar or profile page.
This is perhaps the easiest thing to do, as all you need to do is call the signOut function attached to supabase which is in turn attached to locals. Once you do that it will recognize the change in auth status and changes will be propagated throughout the app, eventually updating the userStore.
I do this via an action on a route:
export const actions = {
    logout: async ({ locals }) => {
        await locals.supabase.auth.signOut();
    }
} satisfies Actions;
At this point, the user should be logged out, the layout’s onAuthStateChange function triggered, and current userStore set to null.
There are a few other things which I haven’t discussed here, such as using storage to upload the profile image. You can check out the lib/services/image.service.ts file to get an idea of how that works. If you’d like to actually run the project, see the README in the repo, as it’ll go through the necessary steps to do so.