For those who just want the juice, here’s the repo.
I’ve seen a number of Stripe tutorials on how to set up subscriptions and do payments with SvelteKit, but for my own benefit, and I hope others, I want to do a deep dive to make sure I really understand what’s going on.
Disclaimer: I’m not an expert, so if you see issues send me an email or submit a pull request on the repo, and I’ll update when I have time.
Before we look at any code, let’s first go through the flow of information between user, server and Stripe. Understanding that will help us better understand the code in the following sections.
Below are the steps taken for a user to click a subscription button, enter their payment information, and arrive at a confirmation page:
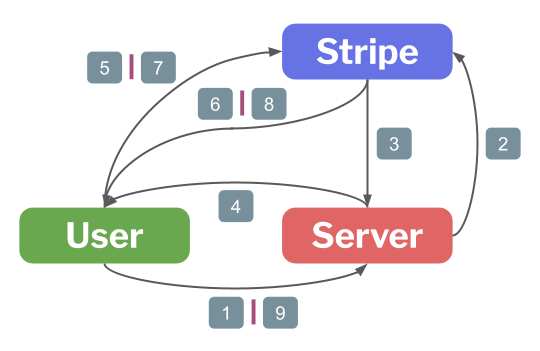
These steps are as follows:
After that the server can request further information from Stripe as need be.
To be able to run this you’ll need to follow the directions in the repo’s readme.
Also, what follows is made with the assumption that you’d have a user logged into your site. In this demo there is no real auth system, but we do simulate a database with a user table in lib/database/client.ts by using an array of one user named test at email test@test.com.
In this section we’ll be mirroring the nine bullet points listed above. We’ll get down to the code level, but I’ll only be pulling out code snippets. It may be helpful to have the full repo handy so you can see how these fit into the context.
This is a form button which links to an action:

The code which accompanies this button:
<form method="POST" action="?/subscribe">
    <!-- Modify this value using your own Stripe price_id -->
    <input type="hidden" name="price_id" value="price_1OzfmXDsePVPAueu6YSvMCQN" />
    <button class="p-5 text-white rounded-full min-w-32 bg-info"> Subscribe</button>
</form>
If you’re not familiar with actions, they are SvelteKit’s way of handling form submissions, and are placed in +page.server.ts or +page.server.js (I’ll use *.ts from now on, but assume *.js is equally valid) files alongside the +page.svelte for that route. Since they are in a .server.ts file, they will run on the server side.
These actions can be named, or you can have a default action which accepts any submission from the associated page. In our case, we’ve name it subscribe, and if you look at the repo you’ll see there are also cancel and reset, the latter of which is a convenience function so we can restart the demo.
One thing to note is there is a price_id input tag which is hidden. This tag contains a value which I created in my Stripe dashboard and is associated with a subscription product. To run the demo you’ll need to do the same, and will need to modify this value to your id.
After the user presses the subscribe button a request is sent to the server which handles it in the +page.server.ts file in the associated action section:
subscribe: async ({ request, cookies }) => {
  const form = await request.formData();
  const priceId = form.get("price_id") as string;
  const session = await StripeService.subscribe(priceId);

  if (session?.client_secret) {
    cookies.set("client-secret", session.client_secret, {
      path: "/",
      httpOnly: true,
      secure: true,
    });
    redirect(302, "/shopping/checkout");
  }
  redirect(302, "/shopping/error");
},In the stripe.server.ts file we find the subscribe function uses the official Stripe library to create a session and return it:
const subscribe = async (priceId: string): Promise<Stripe.Checkout.Session | undefined> => {
  if (stripe) {
    try {
      return await stripe.checkout.sessions.create({
          ui_mode: 'embedded',
          line_items: [
              {
                  price: priceId,
                  quantity: 1
              }
          ],
          mode: 'subscription',
          return_url: `${PUBLIC_DOMAIN}/shopping/subscribed?session_id={CHECKOUT_SESSION_ID}`
      });
    } catch (error: any) {
      console.error(error);
    }
  }
};Here we’re calling out to the Stripe API which makes sure the price_id and associated information is accurate. Part of the Session object gives us a client_secret which we attach via a cookie that will be sent back to our user.
At this point you might be asking how does the Stripe API recognize us?
If you look at the top and then the bottom of the stripe.server.ts file you’ll see a stripe variable is initialized using our PRIVATE_STRIPE environment variable.
let stripe: Stripe | undefined;

...

const initializeStripe = async (): Promise<boolean> => {
  if (PRIVATE_STRIPE && PUBLIC_STRIPE) {
    stripe = new Stripe(PRIVATE_STRIPE);
    return true;
  }
  return false;
};

(async () => {
  const result = await initializeStripe();
  if (!result) {
    console.log('[Stripe service] - Failed to initialize');
  } else {
    console.log('[Stripe service] - Started');
  }
})();If this is not successful, because it can’t be found in the .env file or the Stripe library itself is not installed, you’ll see a warning pop up in the terminal.
This part really only pertains to the redirects at the end of subscribe:
subscribe: async ({ request, cookies }) => {
  const form = await request.formData();
  const priceId = form.get("price_id") as string;
  const session = await StripeService.subscribe(priceId);

  if (session?.client_secret) {
    cookies.set("client-secret", session.client_secret, {
      path: "/",
      httpOnly: true,
      secure: true,
    });
    redirect(302, "/shopping/checkout");
  }
  redirect(302, "/shopping/error");
},Depending if a session was created, we tell the user to redirect to one of two different routes. We’ll assume that the session creation was successful and go on to step (5).
The cookie is part of the redirect response from step (4), and being a cookie it will be attached to the user’s subsequent request. This part is a quick turn around where the user receives the redirect with the cookie, which it takes and attaches to it’s request for the shopping/checkout route.
You may wonder why we used a cookie when the client secret could have been sent in the redirect path as a parameter like this:
redirect(`shopping/checkout/?client_secret=${client_secret}`);
While this would work, it’s not as secure, so using a cookie makes more sense.
When the user does redirect to the checkout page, they’ll first hit the +page.server.ts for that route and the load therein:
export const load: PageServerLoad = ({ cookies }) => {
  const clientSecret = cookies.get("client-secret");
  if (clientSecret) {
    return {
      clientSecret: clientSecret,
    };
  }
};
The only purpose of this is to get at the cookie, take out the client_secret, and pass it to the +page.svelte as part of the data variable. This is done as part of server-side rendering, and the page is sent back to the user. In that returned +page.svelte you can see that we mount the page, and then call out to Stripe directly using the PUBLIC_STRIPE key, as shown below:
export let data;

onMount(async () => {
  const stripe = await loadStripe(PUBLIC_STRIPE);
  const clientSecret = data.clientSecret;

  if (stripe && clientSecret) {
    const checkout = await stripe.initEmbeddedCheckout({
      clientSecret,
    });

    if (checkout) {
      checkout.mount("#checkout");
      return;
    }
  }

  goto("/shopping/error");
});
It’s important to note that the credit card information does not go through our server, instead being sent directly from the user to Stripe.
Using that client_secret we’ve been passing around as a cookie, we call Stripe and get our embedded payment form. That form is then attached to the div with an id of #checkout.
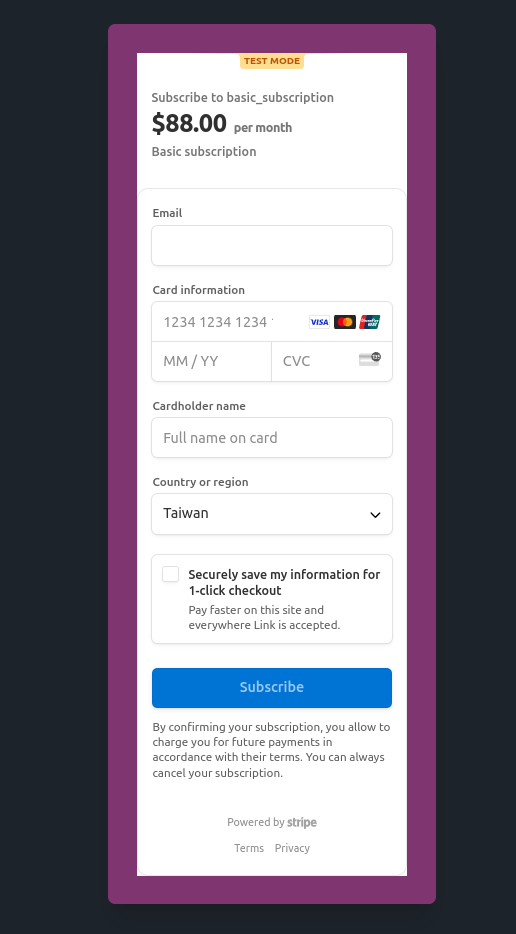
You can fill out this form using any email and name. The default credit card for testing is 4242 4242 4242 4242 and any three-digit code.
At this point Stripe will process the payment. Yay, the easiest step by far!
Stripe fills in the session_id part of the return_url we created in the initial subscription process. If you remember, it looked like this:
return_url: `${PUBLIC_DOMAIN}/shopping/subscribed?session_id={CHECKOUT_SESSION_ID}`This completed return_url is sent back to the user.
When this happens the user will navigate to /shopping/subscribed and the session_id is sent with it. We first hit the +page.server.ts file on the server side, which then verifies that the checkout session was completed successfully.
export const load: PageServerLoad = async ({ url }) => {
  const sessionId = url.searchParams.get("session_id");
  if (sessionId == null) {
    redirect(302, "/shopping/error");
  }

  const session = await StripeService.getSession(sessionId);
  if (session?.payment_status != "paid") {
    redirect(302, "/shopping/error");
  }

  ...
};
The Session object contains a lot of information that you may want to store in the database. We save the customerId, subscriptionId and information about when it expires to our fake database.
export const load: PageServerLoad = async ({ url }) => {
  ...

  let user = db.getUser();

  if (user) {
    user.customerId = session.customer as string;
    user.subscriptionId = session.subscription as string;
    user.subscriptionStartDate = new Date().getTime();

    const subscription = (await StripeService.getSubscription(
      user.subscriptionId
    )) as Stripe.Subscription;

    user.subscriptionStatus = subscription.status;

    return db.updateUser(user);
  } else {
    // Insert payment rollback if failed
  }

  redirect(302, "/shopping/error");
};
You’ll see that we use the subscriptionId to call the Stripe service and get the status of the subscription, as the session doesn’t include this information. The status in the object pertains to the session itself.
The last thing which happens we return our user information as data and the user sees a Thank you for your purchase! message.
That takes us through the process of creating a subscription with Stripe, though we left a number of things out of this write, including how to cancel a subscription. Some of this is include in the repo, but other stuff, like purchasing non-subscription services, are not. The code, though, should be easily adapted to that purpose.
If you have questions, feel free to email me at thespatula@fastmail.com.